.: Upgrading
Upgrades are done via a flushable hex file. Upgrades assume you or a beta tester and have download the 2.0 official hex. The process is a bit of a curve to get the hang of but once you get it to work its catching. You will need 3 things
1) A wire or controller to jumper the pins. (Newer models have a button )
2) A hex file.
3) The flash program
If you have a reset button, pressing it down will put you in upgrade mode. Make sure the USB is plugged in and no controller are attached. If you don’t have a reset button you must use the jumper method. For jumpers or controllers you must jumper two pins again with no controller attached (unless you have a jaguar and in that case you can use the 7, 8, or 9 buttons ). Make sure the Bliss-Box USB cable is unplugged, jumper the pins or press the correct button, then plug it back in.
Once it goes in update mode you will see "BLISS-UPDATOR" hardware found. NOTE: you only see this the first time. Once the updater is installed the OS will not mention it again. Once that is done you can flash the provided update bat file. Once finished, remove the jumper or release the switch, unplug the device, and use as normal.
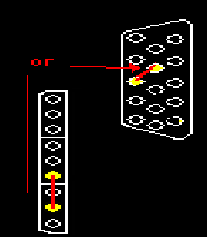
How to jumpers: Any household paper clip(small) or wire should work. If you have a Jaguar controller, you can connect it and just press down 7 8 or 9 while plugging in the USB port. This is the same as jumpering the pins. The image above are the examples of each connector that can be used to enter in upgrade mode.
NOTE: you must hold down the button or leave the wire in the entire flashing process.
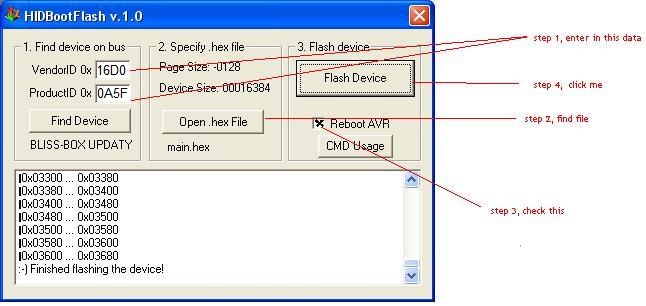
Once you get in to updater mode run the flash app. Set the app up like so.
If you bought a Bliss-Box and have Received it before 4/21/15, you will need to use the old VID/PID ( 0d50:0008 )
You are now ready to go, remove the jumper. If you don't have a neo-geo, jaguar, or psx port you will need to contact me about advanced flashing.
Playstation Pressure Sensitive Buttons:
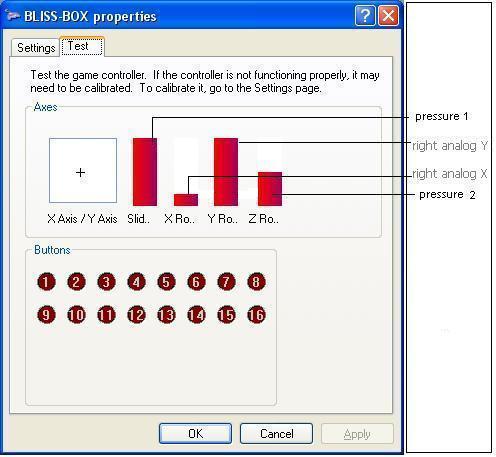
Sorry this images is old, but you get the idea
Only two buttons can be pressure active at once. The default is [] and X, if you want to change the button Press start hold it down ( this should pause the game ), then press select hold it down, and finally Analog button Left ( button config 1) or analog button right ( button config 1). So you will have one of the two.
start+select+analog left
or
start+select+analog right
Now while that combo is pressed almost impossible with one hand when holding the controller ( being the idea ), press the button you'd like. If you want L2 to have pressure for the extra HID analog 1 slot You would do:
start + select + analog-left + L2 ( left go an any order )
If you want Up to have pressure for the extra HID analog 2 slot You would do:
start + select + analog-right + up ( left go an any order ) |
|
Calibration
First you need to calibrate the controller in the operating system. For example, in XP Go to Start > Control Panel > Game Controllers.
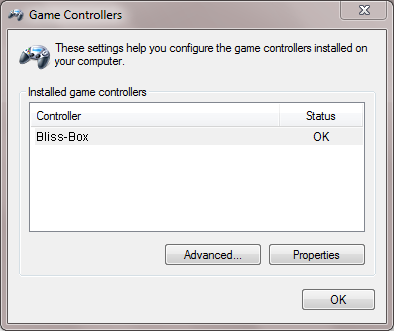
Then go to properties
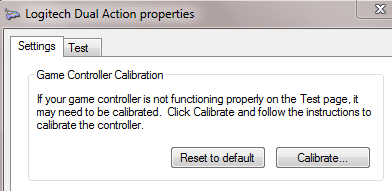
Once the calibrate button is hit, it will talk you through the rest.
There also are controller native calibration functions. These functions are normally done when the controller is first powered up. I believe in most cases it’s done with or without the consol present. In other words this is done once voltage is applied. In some cases you can force the native calibration mode, here are the known ways to do so for the given controllers.
N64: Simultaneously pressing the L, R, and START buttons
NOTE: Bliss box also uses this combo to go in to UDLR mode, In this case the Bliss-Box will also accept L,R, and select.
GC: Holding down X, Y and start for three seconds at any time will recalibrate the controller
PSX: Switch to digital and back to analog
These are unknown to me, and possibly don't have a native calibration button combo. Saturn, DC, 5200, veterex.
How to enter UDLR mode
To enter UDLR mode, press shoulder left, shoulder right and the start or select button all at once. To exit, press the same. NOTE: for n64 and GC its best to use select not start.
Resetting the device with a reset button
V 1.0: All you need to do is unplug the controller your using, press the reset, then plug in the new controller and press reset again. The double pressing is not mandatory, but it prevents harm to you controller. To date, I have only destroyed one controller ( 3rd party crap ) but better safe than sorry. This is 1.0 only.
V2.0: Pressing the reset button is not really necessary. You can just unplug the controller you are using and plug in the new controller without the need of a reset button. However, if the controller you plug in does not work, leave it connected and press reset.
Resting the device. Without a reset button:
Unplug the controller and unplug the USB. Plug in the new controller, then the USB. ( works for 1.0 and 2.0 )
Atari paddle modes
The paddles will have 3 modes. Atari, mouse, and stick mode.
1) In Atari mode the paddles will act just like the paddles do on the atari system . Each paddle has an associated analog. ( slider and dial on the USB HID ). Player 1’s buttons shows as right(main stick) ans player 2’s buttons shows as left(main stick). This is how its done on the Atari. This works great for stellaX.
2) In stick mode the paddle player 1 only has one role, its button presses HID (6) start. This is for emulators that need another button. The player two is your paddle and moving left makes the main joy stick tilt left. When you let go the stick rests in the middle position. Same goes for right. It is done this way so non paddle configs ( like jnes ) will work. The only way to control these emulators is via the mouse or joystick. You would think mame would work on mode one but you will quickly relies it does not work well. For example in mame set player spinner to an analog. Now move the analog all the way left ( in mode one ). Hmm, its moving left... Should it not be there by now? You can play with the setting till you are blue in the face it just sucks. Put it in mode two and set the sensitivity to 3 or so. Ahhh, much better.
3) mouse mode. For right now mouse mode basically moves the mouse to an amount you move the paddle. If the paddle is all the way left and you quickly move the paddle right, the mouse cursor will travel there quickly. If the paddle is not being moved you can still control the mouse cursor with your mouse. Ideally you would want the cursor to match the position of the paddle but in that case your mouse would be useless. This may yet become an option not sure. To use button one on the mouse press the button on the paddle ( player 2) that controls the mouse. The paddle you don't use will be mouse button 2 if this button is needed at all. Why is player 2 the main paddle? Well player two actually has a much better response than player one.
To set the modes...
Atari mode. ( nothing is needed )
Stick mode ( press and hold player 1’s button, when plugging in the USB )
Mouse mode ( press and hold player 2’s button, when plugging in the USB )
How to switch Player 4 with Player 2?
Ok here is a big problem for me.. but here is the answer. Sometimes you have a USB port with 4 ports (1,2,3,4) and the players are (3,1,4,2) If you’re like me you would rather it be in order, no?
http://www.wingmanteam.com/latest_software/gadgets.htm#JoyIDs_Utility
Go to this link and download JoyID It will allow you to change HID joystick HID ID's So if you have a 2 player box and can't just change controllers with the guy next to you and would like the left side of the box to be player 1 and the right side to be player 2, you can ;) It's not a hard app to use, just follow the help that comes with it.
.: 3rd party controllers
In general there will not be any troubles using 3rd party controllers. However they are not always designed the same way the original manufacture intended. It is very likely they will work on the consol but not on the Bliss-Box. For example most Madcatz n64 or game cube work, but not with Madcatz dream cast. Although an attempt was made to support everything under the sun, only the original manufactured controllers are guaranteed to work, also helps to check the compatibility list. |
|
Bliss-Box, the only way to play....
home
|